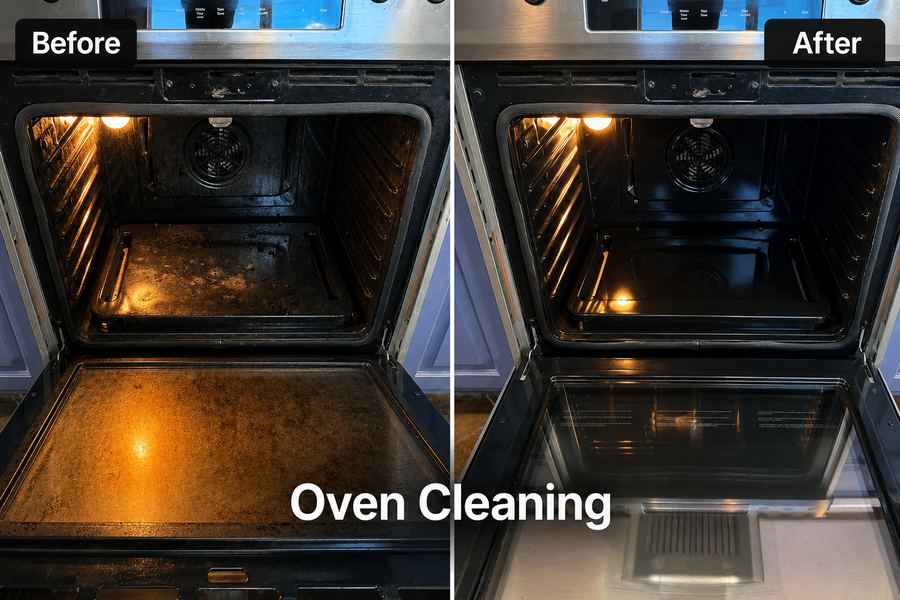
Oven Cleaning at a Glance
| Best For | Ovens with years of baked-on grease or carbonized residue that normal wiping and self-clean cycles haven't resolved |
| Service Type | Premium add-on — not included in standard house cleaning |
| Typical Time | Roughly one hour for an ordinary oven with moderate buildup; heavier buildup or complex appliance designs can take longer |
| What May Improve | Baked-on grease, carbonized food residue, general grime on cavity walls, racks, and door glass — when the manufacturer's instructions permit the treatment |
| What May Be Permanent | Discoloration, etching, or finish damage that predates cleaning, or damage caused by prior use of incompatible products |
| Most Important Safety Rule | The exact appliance manufacturer and model — not the cleaning product label — determines what's safe to use |
| When Service May Be Declined | When the model can't be identified, the manual is unavailable or unclear, or the requested treatment isn't confirmed as compatible |
| Cities Served | San Marcos, Carlsbad, Oceanside, Vista, Escondido, and surrounding North County San Diego communities |
What Professional Oven Cleaning Actually Includes
Professional oven cleaning is a different service than several things it's often confused with:
- Wiping fresh spills — routine maintenance that most homeowners already do themselves.
- Running a self-clean cycle — a high-heat process built into many ovens (explained in detail below), which is not the same as hands-on detailing.
- Steam cleaning — a lower-temperature, manufacturer-specific cycle available on some ovens.
- Applying a household degreaser — useful for light grease, but generally not enough for buildup that's been baked on repeatedly over months or years.
- Appliance repair — cleaning does not fix broken components.
To be direct about that last point: professional cleaning does not repair failed heating elements, broken door glass, damaged enamel, faulty door seals, malfunctioning igniters, or electrical problems. If any of those issues are present, they need a qualified appliance repair technician — cleaning happens separately from, and after, any necessary repairs.
What a Self-Cleaning Cycle Can — and Cannot — Do
Self-clean cycles work by heating the oven cavity to a very high temperature — high enough to burn compatible food soil down into ash. That's a genuinely useful process, but it has real limits homeowners should understand before assuming it "didn't work":
- Ash typically remains after the cycle and usually needs to be wiped out once the oven has cooled — the cycle burns off residue, it doesn't remove the resulting ash for you.
- Heavy spills may need preparation beforehand. Large spills or heavy grease can sometimes require some manual removal before running the cycle, depending on the manufacturer's guidance.
- Results vary by oven design, soil level, and the manufacturer's own instructions — not every self-clean cycle performs identically, and not every type of residue responds the same way.
- Racks and accessories may need to be removed beforehand, depending on what the owner's manual specifies — some racks aren't rated for self-clean temperatures.
- A self-clean cycle is not the same as detailed hand cleaning. It addresses the cavity interior at high heat; it doesn't detail racks, door glass, gaskets, or exterior surfaces, and some homeowners still want professional detailing afterward for a more thorough, hands-on result.
Self-clean cycles involve very high temperatures and should only be used according to the specific oven's owner's manual. We're not going to tell you how to bypass safety locks or override appliance controls — if your self-clean cycle isn't functioning as expected, that's a question for the manufacturer or a qualified appliance technician, not a workaround.
Types of Oven Cleaning Systems
Not every oven fits neatly into one category, and some appliances combine more than one system. In general terms:
| System | How It Works | Typical Homeowner Follow-Up | Main Caution | Why the Manual Matters |
|---|---|---|---|---|
| High-temperature self-clean | Cavity is heated to a very high temperature, burning compatible soil into ash | Wiping out ash once cooled | Some racks and accessories aren't rated for these temperatures | Manual specifies prep steps, rack removal, and cycle duration |
| Steam-clean | Lower-temperature cycle using water/steam to loosen light residue | Wiping down loosened residue | Less effective on heavy, carbonized buildup | Manual specifies water amount and cycle limitations |
| Manual-clean | No built-in cleaning cycle — cavity is cleaned entirely by hand | Regular hand cleaning using manufacturer-approved products | Requires knowing which products are safe for the specific finish | Manual specifies approved cleaners and techniques for that finish |
| Specialty / premium enamel systems | Certain finishes (including some porcelain and specialty enamels) have specific care requirements | Often requires manufacturer-approved products only | Generic commercial oven cleaners may not be compatible | Manual (or manufacturer support line) is often the only reliable source for approved products |
Why the Owner's Manual Is the Controlling Authority
This is the single most important principle in this entire guide: the appliance manufacturer's instructions for the exact model take precedence over generic cleaning habits and what's printed on a cleaning product's label.
Here's why that distinction matters so much:
- Different brands and models permit different products — what's safe on one oven's interior finish may not be safe on another, even from the same manufacturer.
- Some self-cleaning ovens explicitly prohibit commercial oven cleaner, even though the product itself may be marketed broadly as an "oven cleaner."
- A product being marketed for use on certain self-cleaning ovens doesn't override what a specific model's owner's manual says — general marketing claims and appliance-specific instructions aren't always the same thing.
- Racks, enamel, door glass, and gaskets can each have different care requirements within the very same oven.
- Before any treatment is selected, the model number should be identified — it's the starting point, not an afterthought.
We're not classifying ovens simply as "standard" or "porcelain" anymore, because that's an oversimplification. The real cleaning decision depends on the manufacturer, the specific model, whether it's a manual-clean, steam-clean, or self-clean system, the cavity finish, the door-glass construction, the rack coating, any existing damage, sensitive components nearby, and which products and tools that manufacturer has actually approved. A blue-tinted interior tells you something about the finish, but it isn't enough information on its own to select a cleaning method.
What Creates the Toughest Oven Buildup
Not all residue is equal, and understanding what you're dealing with helps set realistic expectations.
Grease builds up gradually with regular cooking and is often the easiest residue to address, though heavy accumulation can still take real time and effort to remove.
Sugary sauces and glazes — barbecue sauce, sticky marinades, spare ribs cooked without a drip pan underneath — are some of the most stubborn buildup we encounter. When sugars bake repeatedly without being cleaned between uses, they carbonize and bond tightly to oven surfaces and glass, becoming far harder to remove than ordinary grease.
Cheese and protein residue can also bake on repeatedly and contribute to buildup, especially in ovens used frequently for baking.
Repeated reheating of the same unaddressed spill compounds the problem — each reheating cycle bakes the residue on more permanently, which is part of why buildup left for years is meaningfully harder to address than buildup addressed within weeks or months.
Carbonized spills and residue trapped between oven-door glass panels (on ovens where the door has multiple glass layers) present their own challenges, since accessing that space safely depends entirely on how that specific door is constructed.
It's important to be honest here: not every stain can be removed. Determining whether discoloration is removable soil or permanent damage to the finish is part of what a professional assessment is for — often, gently testing how residue responds tells us more than looking at it does.
Is Professional Oven Cleaning Right for You?
It may be a good fit if:
- The oven has years of baked-on residue that hasn't responded to normal wiping.
- Normal cleaning attempts haven't made a meaningful difference.
- You can't safely reach or scrub inside the cavity yourself.
- The appliance functions correctly but looks cosmetically neglected.
- You want an honest assessment before deciding whether to replace the appliance.
- You're doing a move-in, move-out, or deep cleaning that includes appliance detailing.
It may not be appropriate if:
- The oven has electrical, ignition, or heating problems — these need a repair technician first.
- The door glass is cracked.
- The enamel is flaking or physically damaged.
- There's suspected contamination inside the insulation.
- The owner's manual prohibits the treatment being considered.
- The model can't be identified.
- The job would require disassembling the appliance or performing repairs.
- There's pest activity or a biohazard situation requiring a different specialist.
If any of the second list applies to your oven, that's not a dead end — it just means the next step is a repair technician, a manufacturer inquiry, or a different kind of specialist before (or instead of) a cleaning service.
DIY vs. Professional Oven Cleaning
DIY may be reasonable for:
- Fresh spills, wiped up promptly.
- Light, regular soil from everyday cooking.
- Routine wiping between deeper cleanings.
- Manufacturer-approved steam or self-clean cycles, used according to the manual.
- Products the manual specifically recommends for that model.
Professional service may be useful for:
- Thick, repeatedly baked-on residue that's built up over years.
- Ovens with complex or specialty finishes where the safe product isn't obvious.
- Difficult-to-reach areas of the cavity.
- Move-out or deep-cleaning projects that include full appliance detailing.
- Homeowners who are concerned about damaging the appliance themselves.
- Situations where you genuinely need an honest cleaning-versus-replacement assessment rather than another guess.
There's no shame in either path. Plenty of DIY methods work fine for plenty of ovens — the goal of this guide is simply helping you recognize which situation you're actually in.
The Biggest Oven-Cleaning Mistakes
These are the mistakes we see most often, whether from homeowners or from cleaners who haven't developed a manufacturer-first process:
- Ignoring the owner's manual entirely and going straight to a product label.
- Assuming every commercial oven cleaner is compatible with every oven.
- Using abrasive pads on delicate or specialty finishes.
- Scraping the glass or cavity without first confirming what that glass and coating can actually tolerate.
- Saturating gaskets, vents, or areas near electrical components with cleaner or moisture.
- Applying cleaner directly to heating elements or sensors.
- Mixing cleaning chemicals together.
- Leaving chemical residue behind instead of thoroughly rinsing or wiping it away.
- Using foil liners inside the cavity where the manufacturer prohibits it.
- Running a self-clean cycle without the preparation steps the manual actually calls for.
This isn't an exhaustive technical manual — it's a list of the patterns that most often lead to a damaged appliance, whether the person cleaning it is a homeowner or an inexperienced cleaning company.
Sensitive Components: What Cleaning Must Account For
A modern oven has several components that require extra care during any cleaning, professional or otherwise:
- Door gaskets — can be damaged by the wrong product or excess moisture.
- Heating elements — should never have cleaner applied directly.
- Igniters (on gas ovens) — sensitive and not something cleaner should contact directly.
- Temperature sensors — can be affected by residue or moisture in the wrong places.
- Convection fans and fan covers — need to be treated according to the manufacturer's guidance, not assumed safe for general cleaner.
- Vent openings — airflow paths that shouldn't be blocked or saturated with liquid.
- Foil liners — some manufacturers prohibit them entirely; using one where prohibited can create its own damage or safety issue.
- Aluminum parts — often require different care than enamel or stainless components.
- Electrical components and control panels — should never be exposed to cleaning products or moisture.
- Coated or uncoated racks — different rack finishes tolerate different cleaning methods.
We don't provide repair advice, and we're not going to walk through how to service any of these components. If something is damaged, loose, or malfunctioning, that's a job for a qualified appliance technician — our role is cleaning what can safely be cleaned, not repairing what's broken.
How Cali Clean Team Approaches Oven Cleaning
Oven cleaning is a premium add-on — it's detailed, deliberate work, and we approach it the same way every time, regardless of how the oven looks when we arrive: we inspect before we scrub.
- Identify the appliance manufacturer and model.
- Review the owner's manual whenever it's available.
- Determine the oven's cleaning system — self-clean, steam-clean, or manual-clean — and its cavity finish.
- Inspect the enamel, glass, gasket, racks, and any sensitive components before touching anything with a product.
- Document existing scratches, discoloration, or damage so there's a clear record of the oven's condition before we start.
- Protect the floor, cabinetry, and surrounding surfaces before any cleaning begins.
- Remove only the components the manufacturer permits removing.
- Select a cleaning method confirmed compatible with that specific model.
- Test an inconspicuous area when appropriate, before treating the full surface.
- Loosen and remove residue without exceeding the permitted method for that appliance.
- Rinse or wipe away all cleaner residue thoroughly.
- Inspect the finished oven and explain honestly if any discoloration or limitation is permanent.
Our overall philosophy is still top to bottom, left to right — but oven geometry, and the sensitive components described above, sometimes require a modified sequence rather than a rigid one-size-fits-all pattern. Depending on what the manufacturer permits and what we verify is appropriate for that specific appliance, that may include manufacturer-approved scraping techniques or specific professional products — but we don't apply one universal method to every oven that comes through the door.
Our Service Policy When the Manual Isn't Available
If the manufacturer's instructions are unavailable, unclear, or incompatible with the treatment a homeowner is requesting, Cali Clean Team may decline the service rather than risk damaging the appliance. In those situations, we may ask the homeowner to help locate the model number or owner's manual before we confirm the job — sometimes that's as simple as a manufacturer's website lookup using the model number found on a printed plate inside the door or along the cavity frame.
This isn't a waiver or a legal document, and we're not offering legal conclusions about liability here — it's simply our operating policy: we'd rather decline an uncertain job than guess with someone's appliance.
The Samsung Case Study: A Lesson That Changed How We Clean Ovens
One project stands out because of what it taught us, not because of a happy ending.
The starting condition: A homeowner hired us to restore a heavily used oven with years of baked-on grease and carbon buildup, with a porcelain enamel interior.
The appliance: A Samsung oven with that enamel finish.
The instruction conflict: At the time, we followed the instructions printed on the cleaning product we were using, which recommended preheating the oven before cleaning. What we didn't know at that moment was that this specific appliance's manufacturer instructions directly conflicted with that product-label guidance.
The resulting finish change: After the cleaning was complete, the oven was clean — but the porcelain enamel had developed a cloudy white appearance that hadn't been there before.
The investigation: Rather than assuming it was leftover residue, we investigated further. The homeowner eventually located the Samsung owner's manual, which specifically stated not to preheat that type of porcelain enamel oven before cleaning.
Our decision: Even though our insurance company declined the claim, we replaced the customer's oven out of pocket, because we had left the home in worse condition than we found it.
The permanent change to our process: That experience changed our procedures permanently. Manufacturer instructions now always take precedence over what's printed on a cleaning product. Specialty and porcelain enamel finishes are treated differently than standard finishes, and if there's any uncertainty about the manufacturer's recommendations, we decline the job rather than risk damage.
The lesson for homeowners: This case doesn't mean one product damages every enamel oven, and we're not here to criticize Samsung, the cleaning product, or the insurance company. The lesson is narrower and more useful than that: appliance-specific instructions matter more than general product instructions, every time, on every oven.
[Insert verified photograph or supporting documentation only if the customer cannot be identified and Cali Clean Team is comfortable publishing it.]
Cleaning vs. Replacement
Cleaning may be worthwhile when the appliance:
- Functions correctly.
- Has removable buildup rather than permanent damage.
- Has an intact cavity, glass, and enamel.
- Is cosmetically neglected rather than physically damaged.
Replacement, or at minimum a technician evaluation, may make more sense when:
- The enamel is damaged.
- The glass is cracked.
- Components are failing or malfunctioning.
- The realistic cost of repair and cleaning exceeds what makes practical sense for that appliance.
- There's a genuine safety concern with the oven itself.
We're not going to give you repair advice or a fixed replacement price in this guide — those depend on your specific appliance and situation. What we can offer is an honest, in-person or photo-based assessment of whether cleaning is likely to meaningfully improve your oven before you commit to replacing it.
Setting Realistic Expectations
What actually determines the result:
- The appliance model and its cleaning system
- The cavity and door-glass finish
- The oven's age
- How much residue has accumulated, and for how long
- Whether it's been repeatedly reheated without cleaning in between
- Any previous chemical use on the appliance
- Any previous scratching or physical wear
- Existing permanent staining
- How accessible the components are
- Any manufacturer restrictions on products or methods
Typical time: Roughly one hour is a reasonable general starting point for an ordinary oven with moderate buildup. Heavier buildup or more complicated appliance designs can take meaningfully longer.
We don't promise a specific restoration percentage. Many ovens can be improved substantially, but the final appearance depends on the appliance finish, age, previous damage, and how deeply residue has carbonized. Some discoloration may be permanent regardless of the method used, and we'll tell you that honestly rather than promising a result we can't guarantee.
Maintenance After Professional Cleaning
- Wipe up spills once the oven has cooled, and do it promptly rather than letting them bake on repeatedly.
- Use a sheet pan or another manufacturer-approved drip-catching method for foods likely to spill or bubble over.
- Avoid lining the cavity with foil unless the owner's manual specifically permits it.
- Follow the manufacturer's approved cleaning routine for your specific model going forward.
- Avoid mixing cleaning chemicals.
- Keep food away from exposed heating components.
- Address sugary spills before they get reheated repeatedly — that's what turns removable residue into carbonized buildup.
- Clean racks according to their specific finish and the manual's guidance.
- Schedule detailed cleaning before residue becomes heavily carbonized, rather than waiting years between services — prevention is consistently easier than restoration.
Local Relevance
Cali Clean Team cleans ovens throughout North County San Diego, including San Marcos, Carlsbad, Oceanside, Vista, and Escondido. Across the region, oven condition varies primarily according to cooking frequency, spill habits, appliance design, cleaning history, and whether residue has repeatedly been reheated — not according to city boundaries. Wherever you're located, our process starts the same way: identifying the appliance and understanding what its manufacturer actually permits before we touch anything.
Oven cleaning pairs naturally with our deep cleaning services, and the same manufacturer-first, inspect-before-you-scrub philosophy carries over into our refrigerator cleaning and stainless steel restoration work. If you're preparing a home for sale or a new tenant, ask about adding oven detailing to a move-out cleaning, and if you clean with us regularly, it can be added to your recurring cleaning schedule. Builders and contractors finishing a renovation can also have oven detailing included as part of post-construction cleaning. Commercial kitchens throughout the region can find related guidance in our commercial cleaning services. For more on our general approach, visit our house cleaning page, or find your area on our San Marcos, Carlsbad, Oceanside, Vista, or Escondido service pages.